
This series will be highly related to UniRx library
Prerequisites
- Familiar with Observer pattern
- Hands on any Rx library
Introduction
MessageBroker is an in-memory publish/subscribe messaging system that provides event-driven, decoupled architecture in order to increase performance, reliability and scalability of your Unity application.
It has three main components:
- Publisher of message — allows message to be broadcasted to the different parts of the application
- Receiver of message — receives the message produced by the publisher.
- MessageBroker — an orchestrator of all events.
We will be using UniRx implementations. The API contains two main methods:
IObservable<TMessage> MessageBroker.Default.Receive<TMessage>

void MessageBroker.Default.Publish<TMessage>
Where TMessage is a type we want to publish/receive.
Receive method returns an observable, so we have to Subscribe in order to be notified by MessageBroker.
Let’s go through a simple scenario, where we will aim to propagate a message across the game that something important has happened.
Message
First let’s create our message class.
To emphasize that our message can be anything, we will call our class GameEvent. Different approach surrounding types of objects that can be used here is described later in the article (see IMessage).
To keep things simple, our GameEvent class will contain only Name property. We will also define two distinct types of our GameEvent (Dragon and HappyHours), which we will be able to reference later.
public class GameEvent
{
	public const string Dragon = nameof(Dragon);
	public const string HappyHours = nameof(HappyHours);

	public string Name { get; }
	public GameEvent(string name)
	{
		Name = name;
	}
}
TIP — It’s good to avoid magic numbers and hard coded strings. One of the easiest way to do that is to create const properties and use “nameof()”. We can easily reference this value later.
Publisher
After that let’s publish a message:
public class Player: MonoBehaviour
{
	// when the dragon appears in range of the player
	void OnDragonNoticed()
	{
		MessageBroker.Default.Publish(new GameEvent(GameEvent.Dragon));
	}
}
Receivers
Now each game object that is interested in certain event has to subscribe through a receiver of our message object class:
public class Villager : MonoBehaviour
{
	void Awake()
	{
		MessageBroker
			.Default
			.Receive<GameEvent>()
			.Where(x => x.Name == GameEvent.Dragon)
			.Subscribe(_ => Flee())
			.AddTo(this);
	}

	void Flee()
	{
		// run as fast as possible
	}
}
This is where familiarity with Rx library comes in handy. As you can see, we do not have to create instance of our receiver (which is an observable). We simply query for our receiver message class type (of GameEvent), to filter out our game events by name, to finally subscribe against them. AddTo() method is crucial here: it links our subscription with Villager game object instance, ensuring proper life cycle when Villager gets destroyed (there are other methods that we could use to manage lifecycle, I left description on few of them in the good practices section).
Now all villagers on the map will know that dragon is coming and they will run away to save their poor lives! Another good example is to use the same event in the AudioPlayer:
public class AudioPlayer: MonoBehaviour
{
	void Awake()
	{
		MessageBroker
			.Default
			.Receive<GameEvent>()
			.Where(x => x.Name == GameEvent.Dragon)
			.Subscribe(_ => PlayGlobalEventSound())
			.AddTo(this);
	}
}
Thanks to this our AudioPlayer component will also be notified about the same events and will play some intense music to inform the player that something important has happened.
To summarize: when Player will notice the dragon, MessageBroker will publish GameEvent, and all Receivers will be notified.
What is more, our subscribers (Villager and AudioPlayer components) which are listening to the same Dragon event, both will react in their own unique way.
With this approach, we successfully decoupled our logic. Player MonoBehaviour don’t have to track any references to Villagers or AudioPlayer — and vice versa. Logic that we provided will be triggered automatically, so either Player, who is responsible here for noticing the dragon, or Villager or even AudioPlayer has to know about each other. Obviously there is many ways of handling such events. The one, that we just went through, is filtering observable by name.
Now lets have a look at another good approach, which is to create a class for each event. Lets stay with the same context and declare DragonGameEvent and HappyHoursGameEvent (both inheriting from our GameEvent class):
public class DragonGameEvent : GameEvent { }public class HappyHoursGameEvent : GameEvent { }This approach is making our solution to work on concrete types instead of string based names. Our Audio Player can now directly listen for the same event, but code gets simpler:
public class AudioPlayer: MonoBehaviour
{
	void Awake()
	{
		MessageBroker.Default.Receive<DragonGameEvent>(_ => PlayDragonSound());
	}
}
Alternatively, in case we need to identify more events or process additional data from event object, we can use pattern matching to identify what event has occurred:
public class AudioPlayer: MonoBehaviour
{
    void Awake()
    {
		MessageBroker
			.Default
			.Receive<GameEvent>(message => PlaySound(gameEvent))
			.AddTo(this);
	}

	void PlaySound(GameEvent gameEvent)
    {
		if (gameEvent is DragonGameEvent dragonEvent)
		{
			// play dragon event sound
		}
	}
}
This wraps up basics and idea behind them. If you want to learn more, below is ours, more practical, approach to utilize power hidden behind the MessageBroker.
IMessage
We like to keep all requests as ScriptableObjects. Most of our Messages inherits from base Message class and implements simple IMessage interface, as below:
/// <summary>
/// Base class for ScriptableObject requests.
/// If you want to call MessageBroker from MonoBehaviours, call them directly -> Message.Create()
/// ScriptableObject can't have constructors, try to add every Message through static Create method.
/// </summary>
public abstract class Message: ScriptableObject, IMessage
{
    [Button]
    [HideInEditorMode]
    public void Publish()
    {
        MessageBroker.Default.PublishMessage(this);
    }
}
If only Unity would support default interfaces we would be able to ignore base ScriptableObject class and use interface only. But for now we have to split it into base class and an interface.
public interface IMessage
{
    void Publish();
}
Below is few useful extensions, so we don’t have to put Type into the angle brackets <> all the time.
public static class MessageBrokerExtensions
{
	public static IObservable<T> ReceiveMessage<T>(this IMessageBroker messageBroker)
	=> messageBroker.Receive<IMessage>().OfType<IMessage, T>();

	public static void PublishMessage<T>(this IMessageBroker messageBroker, T message) where T : IMessage
	=> messageBroker.Publish<IMessage>(message);
}
Thanks to this setup, we don’t have to call Receive of Type every time we want to handle IMessage, of the given Type. It is a small improvement but it really makes life easier. To visualize the difference, this is before:
MessageBroker.Default.Publish<IMessage>(message); // message.Publish();
MessageBroker.Default.Receive<IMessage>().OfType<IMessage, GameEvent>();
and after the changes:
MessageBroker.Default.PublishMessage(message); // message.Publish();
MessageBroker.Default.ReceiveMessage<GameEvent>();
Additional benefit to using ScriptableObjects and a base class is keeping MessageBroker abstraction well separated. So if we would like to switch to different implementation or concept, we can easily do it in one place.
Clean and simple right?
After all this changes, our GameEvent message class, from the original example, would now look like this:
public class GameEvent : Message
{
    public const string Dragon = nameof(Dragon);
    public const string HappyHours = nameof(HappyHours);

    [SerializeField] string name = default;
    public string Name => name;

    public static GameEvent Create(string name)
    {
        var instance = CreateInstance<GameEvent>();
        instance.name = name;
        return instance;
    }
}
TIP — ScriptableObjects can’t have constructors. Elegant way to bypass this, is adding static Create method and assigning values, as we usually do in the constructors.
And our Player class, like this
public class Player: MonoBehaviour
{
	// when the dragon appears in range of the player
	void OnDragonNoticed()
	{
		// before:
		// MessageBroker.Default.Publish(new GameEvent(GameEvent.Dragon));
		// now:
		GameEvent.Create(GameEvent.Dragon).Publish();
	}
}
Custom Editor
There is one more improvement to the whole thing, that is really worth mentioning. If you are using Odin Inspector (which we highly recommend), you can just put [Button] attribute above Publish() method in our base class. This will enable you to easily propagate Messages along all Receivers from the Inspector in the play mode.
If you don’t have Odin Inspector (again, which we really recommend), you can use the following code:
[CustomEditor(typeof(Message), editorForChildClasses: true)]
public class Messageditor : Editor
{
    public override void OnInspectorGUI()
    {
		DrawDefaultInspector();

		if (!Application.isPlaying) return;
		if (!(target is IMessage message)) return;
		if (!GUILayout.Button(nameof(IMessage.Publish))) return;

		message.Publish();
    }
}
Thanks to all of this, we can now create Message assets in our project, and test our system by clicking “Publish” button to debug certain functionality.
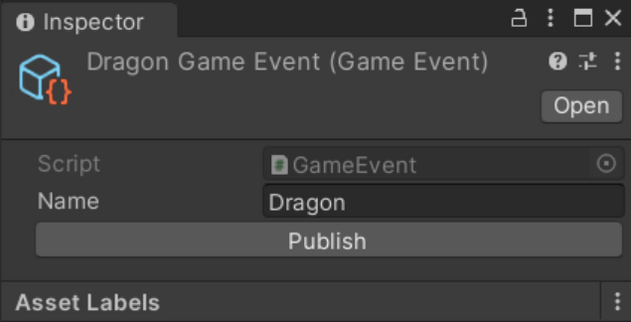
It helps us to keep our messages organized. Debugging is easy. And whole game development process is much more comfortable.
Utilities
You can also create many utilities based on ScriptableObjects and the Messages system. Another utility which is pretty handy is component that allows you to activate GameObject after certain message is received:
/// <summary>
/// Activates game object when receive Message
/// </summary>
public abstract class ActivateOnMessage<T> : MonoBehaviour where T : Message
{
	// the message itselft so we can reference it from the inspector
	[SerializeField] protected T message;

	// condition that has to be met to activate an object
	// this declaration allows to change base function in case different filtration is needed
		protected virtual Func<T, bool> predicate =>
			incomingMessage =>
			incomingMessage.GetType() == message?.GetType();

		public virtual void Awake()
		{
			this.gameObject.SetActive(false);

			MessageBroker
				.Default
				.ReceiveMessage<T>()
				.Where(predicate)
				.Subscribe(x => gameObject.SetActive(true))
				.AddTo(this);
		}
}
// general class that will activate object when any referenced message of type Message is received
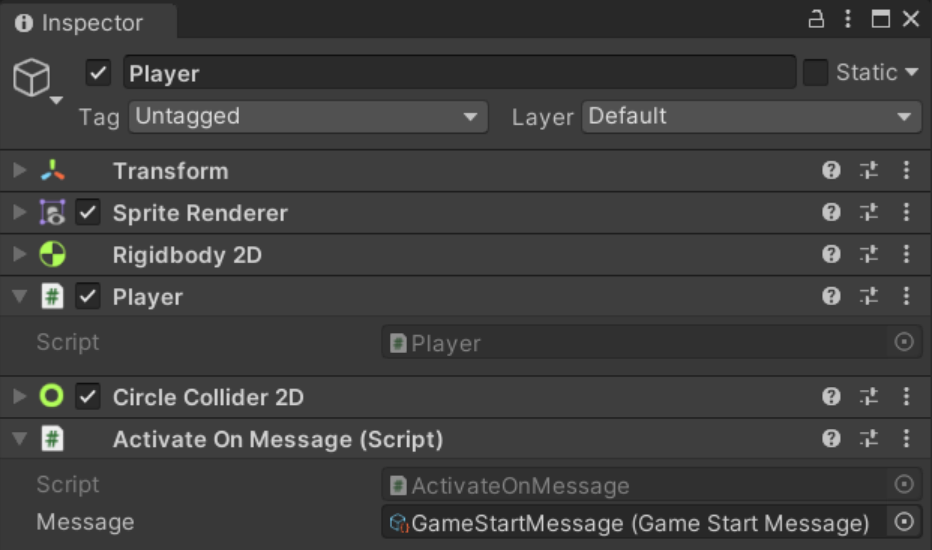
public class ActivateOnMessage : ActivateOnMessage<Message> { }When attached to a GameObject, above component looks like this:
Good place to take advantage of the above utility is to manage our game loop.
Lets say we have a game manager that is propagating game loop events like GameStart, GameEnd, GameWon, GameLost etc. With our utility tool we can easily Activate / Deactivate certain GameObjects by adding ActivateOnMessage component to GameObjects associated with our game loop.
What’s more, we have marked our ActivateOnMessage class as Generic. This gives us ability to switch base Type and to override predicates in more complex scenarios.
For example if we add ActivateOnMessage component we can reference any kind of Message as our base predicate is comparing only type of incoming message and the value referenced from the inspector:
protected virtual Func<T, bool> predicate => incomingMessage =>
	incomingMessage.GetType() == message?.GetType();
In order to filter GameEvents, like in our initial examples (by name), now we only need to simply create a class that inherits from ActivateOnMessage. Through usage of generic types we can reference any properties and create custom conditions:
public class ActivateOnGameEvent : ActivateOnMessage<GameEvent>
{
	protected override Func<GameEvent, bool> predicate =>
		incomingMessage =>
		incomingMessage.Name == message.Name;
}
And component like this:

That being said, in 90% of cases, we simply use ActivateOnMessage and instead do filtering through properties, we filter them by type:
public class DragonGameEvent : GameEvent { }
public class HappyHoursGameEvent : GameEvent {}
Key take-away here is that it is much easier to maintain strongly typed messages. Otherwise you would end up hardcoding tons of settings in the inspector of many GameObjects scattered across whole solution. Which is not scaling well and is prone to human errors.
Unity Code Samples
All code samples can be found on our GitHub page
Example 1 — Color Switcher
In this example we will use MessageBroker as simple example of code decoupling. We will create : ColorSwitchMessage — message as a request to switch color ColorGenerator component, that will generate new ColorSwitchMessage with random color whenever space bar is pressed ColorSwitcher — object that will switch its color whenever receives ColorSwitchMessage
Example 2 — Color Switcher with ScriptableObject request messages
In this example we will improve our code and extract Message into ScriptableObject.
Example 3 — Zone Change
In this example we will see how to manage and decouple Game logic from UI by using Messages. We will extract abstraction for our Messages and use IMessage class.
Example 4 — Activate on Message
In this example we will create generic components to activate messages of given type. We will create countdown that publishes Game Start Message and activates the Player with utility component.
Good Practices
Lastly, lets make notes around few good practices that are worth mentioning here:
- It’s good to avoid magic numbers and hard coded strings. One of the greatest way is to create const property and use “nameof()”. We can easily reference this value later.
- ScriptableObjects can’t have constructors. We can replace it in elegant way by creating static Create method and assign values as usual in constructors.
- Lifecycle: remember to dispose subscriptions of your observables by using TakeWhile, TakeUntil, TakeUntilDestroy and TakeUntilDisable or simply add .AddTo(this) when you are in MonoBehaviour to prevent execution if component is destroyed that may leading to unexpected behaviours
Where To Go From Here
This is first part of the article about UniRx. If you are interested, be sure to check next part that will cover in details the monitors.
All related scripts (and more!) can be found in our examples repository, so please give it a try! Finally If you want to do more reading check resources section!