
Prerequisites
- Familiar with state pattern
- Hands on events
- Hands on generics
Introduction
We were looking for lightweight solution for managing state of entities in Unity. We placed our bet on Stateless.NET library that we used previously during development of .NET Applications. It’s a nice and lightweight library under Apache 2.0 License.
Why stateless?
- Flexible
- Lightweight
- Hierarchical States
- Possibility to reenter the state
- Entry/Exit and Activation events
- Guard clauses — for easy rules definition
- Graph preview
- Easy to read and maintain
Unity Installation
Open NuGet package manager and search for Stateless
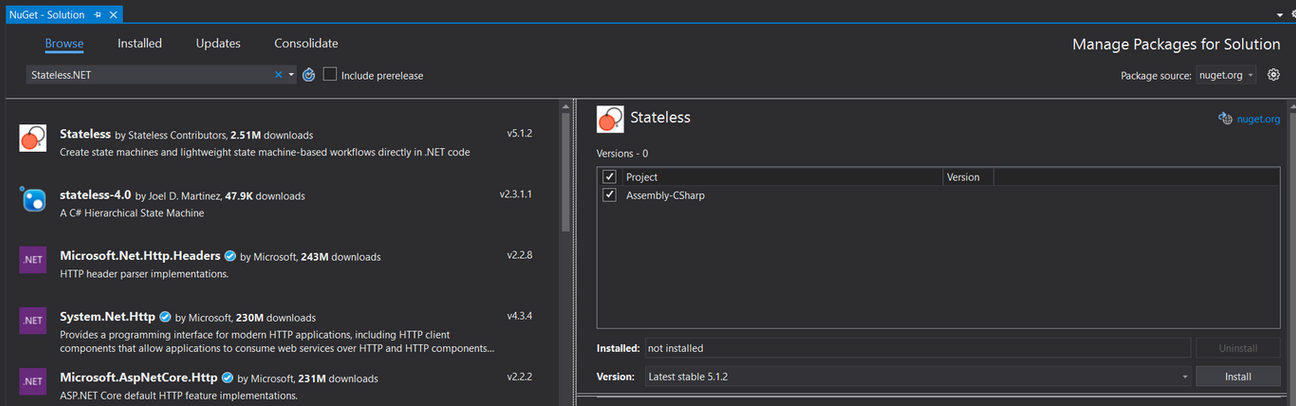
After installation, copy Stateless.dll and Stateless.xml from YourProject\Packages\Stateless.5.1.2\lib\netstandard2.0

Create folder for external, non-unity packages in Assets directory. It may be something like
1
\Assets\Libraries\Stateless\
and paste files there.
Now we are ready to go! :)
How To Use
Let’s create our Chest class and define our Trigger and State types:
public class Chest : MonoBehaviour
{
	public enum State { Opened, Closed }
	public enum Trigger { Open, Close }
}
Basic approach is to define representation of State as Enums, but thanks to generic types it can be everything, even MonoBehaviours.
It’s also good to define states and triggers directly in the class so we will avoid possibility of name duplication while creating our state machines. After that we can create our StateMachine. Let’s do it in Awake method.
private StateMachine<State, Trigger> stateMachine;

private void Awake()
{
	stateMachine = new StateMachine<State, Trigger>(State.Closed);

	stateMachine
		.Configure(State.Opened)
		.OnEntry(OnChestOpened)
		.Permit(Trigger.Close, State.Closed);

	stateMachine
		.Configure(State.Closed)
		.OnEntry(OnChestClosed)
		.Permit(Trigger.Open, State.Opened);
}
We have to call Configure method on every state to set up rules and relations between our states. After that we can define what actions can be performed during each state. Most common methods used during configuration for state machines are:
- OnEntry / OnExit — accepts Action which will be triggered on state enter / exit
- OnEntryFrom — accepts Action which we want to perform after a transition from a certain state
- Permit — the main method where we specify a valid state transition based on a trigger
- PermitIf — as above with so called Guard (boolean function)
- SubstateOf — method which sets parent state
Lets look at the following example, where we are configuring state Opened and we are permitting Trigger Close to be called, after which state machine will transition its state to Closed:
stateMachine
	.Configure(State.Opened)
	.Permit(Trigger.Close, State.Closed);
Next we will configure state Closed. This time with the use of PermitIf . It is almost the same as above Permit function, but with ability to set up the Guard Clause — which will act as a Rule that will tell us whether we can enter triggered state or not:
stateMachine
	.Configure(State.Closed)
	.PermitIf(Trigger.Open, State.Opened, () => player.HasEpicKeyInInventory());
Lastly lets use SubstateOf — method which allows us to define hierarchy of States. We will use it for locked state, and we will set it as a sub-state of state closed:
stateMachine
	.Configure(State.Locked)
	.SubstateOf(State.Closed)
To check in which sate our machine currently is, we can call IsInState method. But this check also honours state hierarchy. So if our state machine would be in State.Locked and we would do check for State.Closed
stateMachine.IsInState(State.Closed);the answer would be true.
Ok now lets see how we can harness benefits of using state machines! But first lets summarize what we did and what it gives us:
- We have created state machine for our Chest
- We have described that at any time Chest enters the state Opened the OnChestOpened action will be invoked
- We have also permitted our Trigger.Close to happen with destination state of Closed
As you can see we didn’t write a single if statement here. For everyone that loves “clean code” or “less code” approach its already huge benefit. Now let explore what potential advantages it gives us when we are constructing complicated state machines. First of all it minimizes conditional complexity and eliminating the need for if and switch statements.
private void OnChestClosed()
{
	// play close animation
	// play close sound
}

private void OnChestOpened()
{
	// play open animation
	// play open sound
}
Secondly we can easily, extend the API for our Chest class by exposing public methods with ability to trigger its state changing logic:
public void Open()
{
	if (!stateMachine.CanFire(Trigger.Open)) return;
	stateMachine.Fire(Trigger.Open);
}

public void Close()
{
	if (!stateMachine.CanFire(Trigger.Close)) return;
	stateMachine.Fire(Trigger.Close);
}
Please note that before firing specific trigger, we are validating if we have a permission to fire this trigger from current state.
Firing a trigger that does not have an allowed transition associated with it will cause an exception to be thrown. To prevent that, simply register some default behaviour and override exception through OnUnhandledTrigger() method:
stateMachine.OnUnhandledTrigger((state, trigger) =>
{
	Debug.Log($"Unhandled trigger {trigger} can't befired from state {state}");
});
Last thing that is really great about stateless is that your state machine can be visualized as a graph. Be sure to check Samples section below to learn more and get info where to find some code examples!
Graph Preview
The big advantage of using Stateless .NET is that you can easily visualize your state machine. To serialize your state machine to standard text-based DOT format, you have to call stateMachine GetInfo() method:
var graphVisualization = UmlDotGraph.Format(stateMachine.GetInfo());Copy graphVisualization variable value and paste it on the here — to see how the graph looks like. Obviously, if someone deems it necessary, this can be easily incorporated into unity through the custom editor script.
Unity Code Samples
All code samples can be found on our GitHub page
Example 1 — Chest
The chest example with Key Code enum as a trigger. It works like a toggle. Whenever we press a Space bar the chest will open if it’s closed or will close if it’s opened. It’s the most simplistic example that shows us base usage of Stateless library.
Example 2 — Chest
In this example we take whole idea from Example 1 a step further and we add custom trigger to open and close our chest. It’s good practice to nest State and Trigger inside the subject class, so we can avoid the name conflicts in case of multiple states and triggers are present in our project. We can refer to Chest state or trigger enum by calling it Chest.State / Chest.Trigger.
Example 3 — Chest
In this example we will learn how to improve our code even further. We’ve exposed the public events that are triggered whenever the chest is open or closed. By doing that we have decoupled our animations from the Chest class itself. We’ve created the ChestAnimation component which is responsible just for playing animations. We do it cause It’s not the Chest component responsibility to do all of those things. Another key take-away — it’s good to subscribe to events in OnEnable / OnDisable methods:
private void OnEnable()
{
	chest.ChestClosed += OnChestClosed;
	chest.ChestOpened += OnChestOpened;
}

private void OnDisable()
{
	chest.ChestClosed -= OnChestClosed;
	chest.ChestOpened -= OnChestOpened;
}
Now we have fully modular solution. We can add another component like ChestSound, ChestParticles, ChestReward etc.
Example 4 — Interactables — just to show what can be done better
In this example we have added simple Player and two chests with overlapping areas. We have removed Update method, which was listening for input, from Chest — because it’s not the Chest responsibility to manage user input. Instead of this, we’ve created Input Monitor with only one job: to gather user input. With this approach we can easily connect or replace this input system to a different one.
We’ve also added Interaction Monitor. It is registering every Interactables that can be interacted with whenever Player enters an interaction area. We have also created IInteractable interface and we extended Chest API by implementing it.
With this approach we are able to extend our system with ease. For example we can implement interface IInteractable in other places like Loot, Levers, Doors, and our Interaction Monitor will pick those up and handle all the communication between those components.
Good Practices
Lastly, lets make notes around few good practices that are worth mentioning here:
- Nest enum States and Triggers inside the subject class to avoid name conflicts in your solution
- If you are creating states as separated classes, pass stateMachine Controller class to the constructor
- Subscribe to events inside OnEnable method, and unsubscribe them in OnDisable
Where To Go From Here
In the incoming blog posts we will like to share more techniques, that we’ve found useful, while working with reactive state machines in our projects. We really hope that more developers can take benefit from using state machines and incorporate them into their toolbox.
All related scripts (and more!) can be found in our examples repository, so please give it a try!
Finally If you want to do more reading check resources section!
Resources
Official Stateless Repository
Really good introduction to Stateless library by S. Henselman
Great read about state pattern